Illustration by Tracy Dai
Ready to land your dream job? Designing a few UX case studies for your portfolio is a powerful way to help you stand out among the crowd.
If you’ve never written a UX case study, don’t worry. It’s not rocket science, but there are certain guidelines to follow to make your portfolio a success. For one, your story should be at the heart of your case study. Hiring managers want to be able to see the process, including times where you made design decisions and why. After all, this process is a huge part of user-centered design.
To show this effectively, you’ll need to retell the start-to-finish narrative behind the process. In this article, we’ll dive into this further and highlight some UX case study examples, templates, and more.
The role of case studies in your portfolio
Before we dive into the anatomy of a case study, it’s important to understand the role of case studies in your online portfolio and where they fit in. First consider the overall structure of your UX portfolio, which should demonstrate your skills and value as a designer.
Here’s an example of a good structure to follow:
1 – Cover Page
2 – About Me
3 – Case Studies (3 to 5)
Remember, hiring managers comb through a lot of portfolios, so it’s important to keep yours focused. Limiting your portfolio to three main sections will help keep it focused and showcase your UX design techniques in the most effective manner.
Your Cover Page should include a hero image, as well as your name and current job title. You may also want to include a short bio and links to your social media accounts here. You can link your case studies directly from this page too.
The second main page is your About Me. This is where you get to show your personality and briefly talk about your history. Where are you from? How did you end up in design? What are some key companies or brands you have worked with? What do you love most about design?
This is also your time to showcase any unique hobbies or things that make you, well, you. Consider including hidden talents, interests, and anything else that is not design related that shows who you are as a person.
The final section includes your Case Studies. This is where you’ll select and showcase projects you’re proud of and explain your design process from start to finish. If you can tell an effective story while integrating human-computer interaction principles throughout, you’ll come across as a great UX designer that any company would like to hire.
The anatomy of a case study
A good case study explains your design process from start to finish, providing reasoning behind each decision leading up to the final design. Remember to keep it concise and precise, as hiring managers will typically scan this part of your portfolio.
To begin, break your case study into these main sections:
1 – Introduction
2 – The Process
3 – The Research
4 – The Design Iterations
5 – The Results and Next Steps
The bulk of your material will be in section two, when you talk about your process. But each section is important for an effective UX case study.
Introduction
Think of the introduction as your time to capture your reader’s attention in a concise, articulate manner. You might include the final mockup or the company logo in this section. Consider including the following:
- Overview – Who is this company? What do they specialize in?
- Challenge – What was the ask? What were you trying to solve?
- Role, scope, and constraints – What was your role? Who else was on your team? What was the timeline of the project? What were the platforms or constraints?
- Approach – What methodologies did you apply?
- Results – Describe the end product.
Of course, you’ll dive deeper into some of these in later sections, so keep it brief for now. You should also highlight and tease any emerging technology that you used (such as AR, AI, or VR) to pique your reader’s attention.
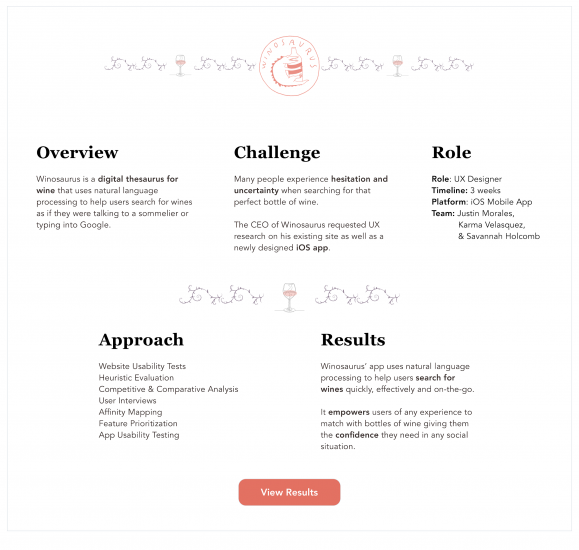
 The introduction of a case study showcases the main sections. Image credit Justin Morales.
The process
Showcasing your process is the most important part of a UX design case study. This is your opportunity to highlight your design-thinking skills and what went into each of your design decisions.
As we know, the UX design process is not linear, and every design calls for a different methodology. For example, sometimes a contextual inquiry is appropriate while other times it is not. Whichever methodologies you used to guide your design, these are the ones to highlight in your case study.
The research
Next, call attention to the research you and your team completed. This is your opportunity to articulate which user research methodologies fit into your design process.
For each methodology, briefly introduce the technique and include why you used it, what you hoped to learn, the result, and how it influenced your design. User research is useless if it doesn’t influence your design decisions.
Here are the most common user research methods:
As you explain the process for your methodology, answer these key questions:
- What did you do?
- Why did you do it?
- What was the result?
- What did you learn?
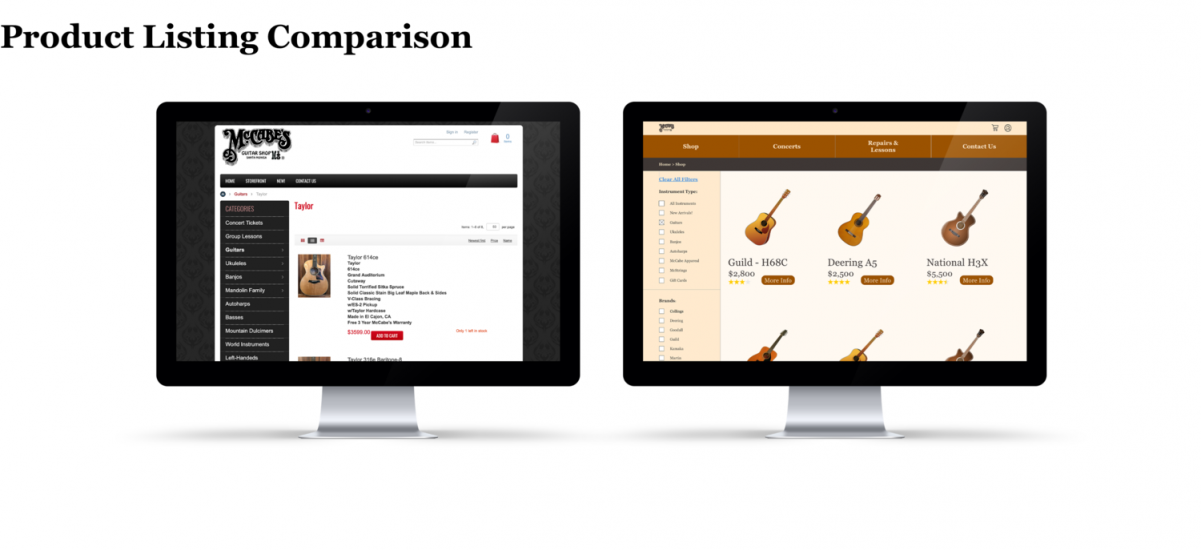
A comparative and competitive analysis is a good way to describe the results and what you learned, as shown below:
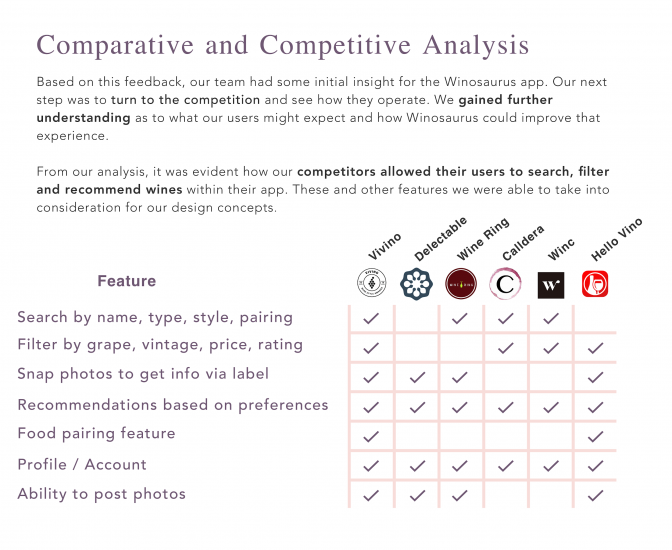
 Using a comparative and competitive analysis in your case study will help showcase the key deliverables and takeaways. Image credit Justin Morales.
Or, you can include your key takeaways in bullet points, as shown in this example:
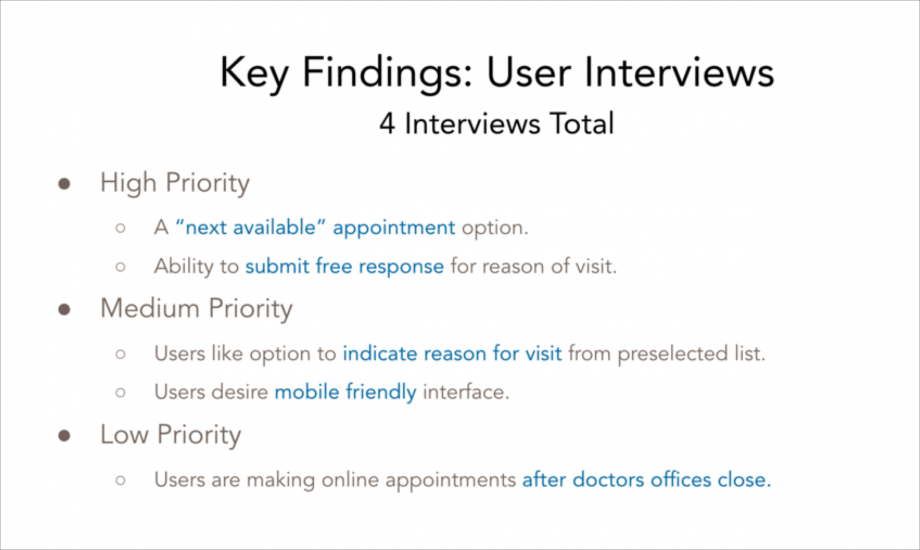
 Summarize the key takeaways you found from your user interviews to showcase what you learned at this point in the process. Image credit Justin Morales.
The design iterations
Next, walk the reader through your design phase. Here is where you can show how you are able to take your research and apply it to your design. These research-based design decisions are at the heart of user-centered design. Your key elements here might include:
As you continue building your story, answer the same questions that you did for the research section:
- What did you do?
- Why did you do it?
- What was the result?
- What did you learn?
If possible, include a deliverable for each methodology. Feel free to link externally to any documents that may be too lengthy for your portfolio site. Below are some examples of case study deliverables during the design phase.
First up is a site map deliverable:
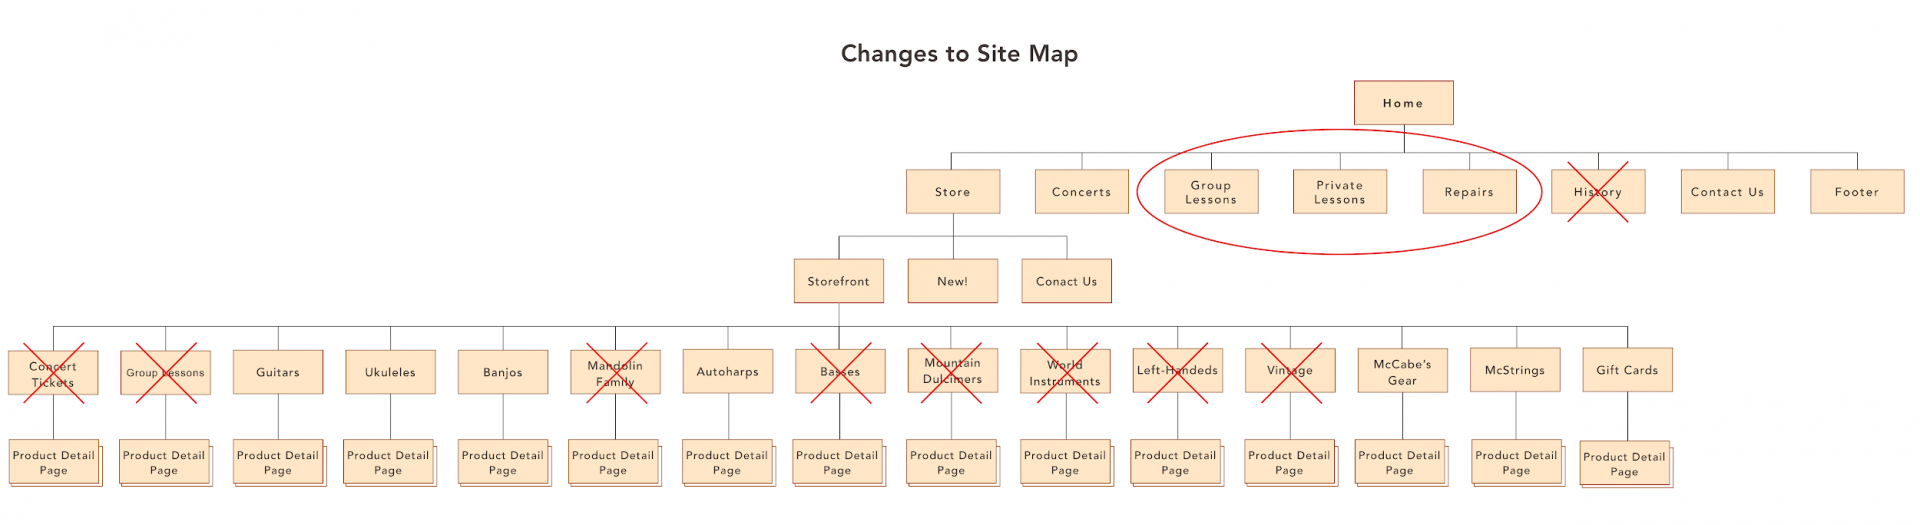
 Highlight changes and recommendations to the site map within your UX case study to clearly show your process. Image credit Justin Morales.
User flows are another great way to show the design you are working on:
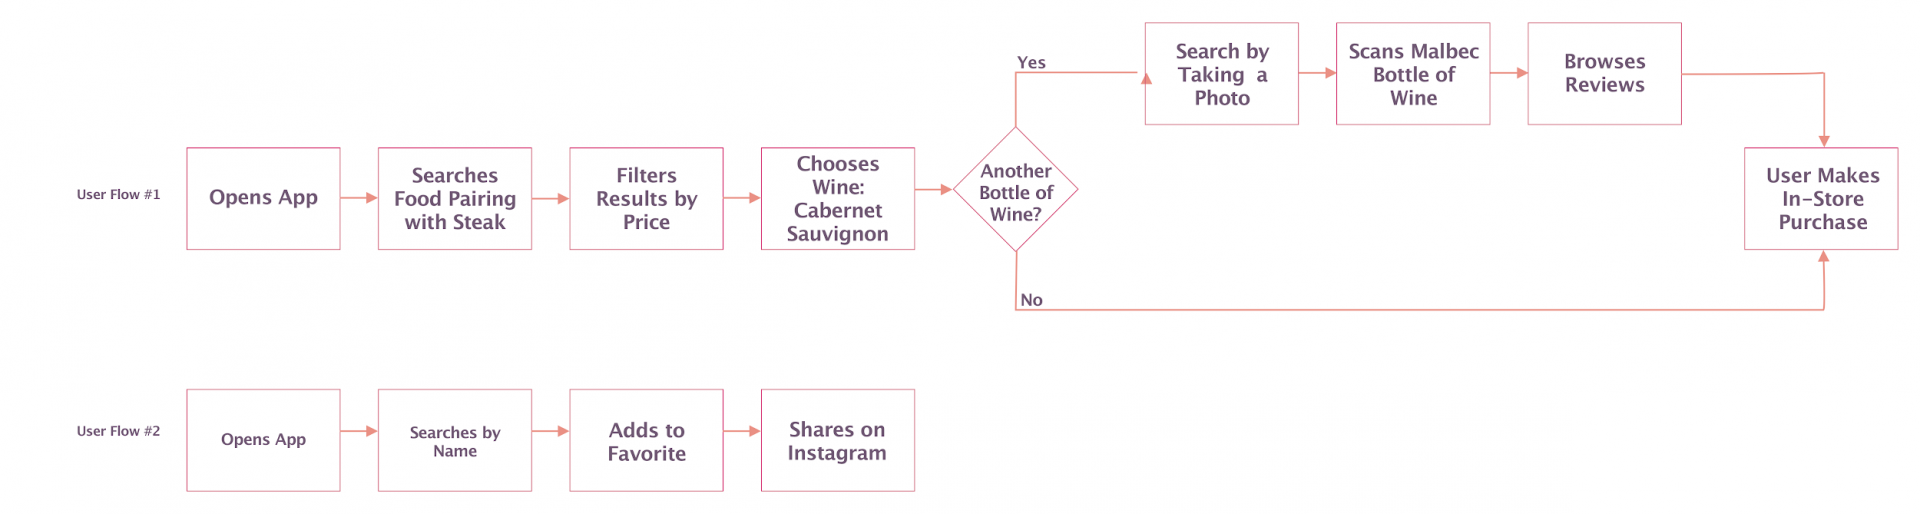
 Consider including user flows within your UX case studies to show further insights into your design process. Image credit Justin Morales.
If user testing was part of your process, make sure to include what you learned from your iterative usability testing sessions here as well. Consider including screenshots of your design with call-outs of key changes inspired by your usability testing like this:
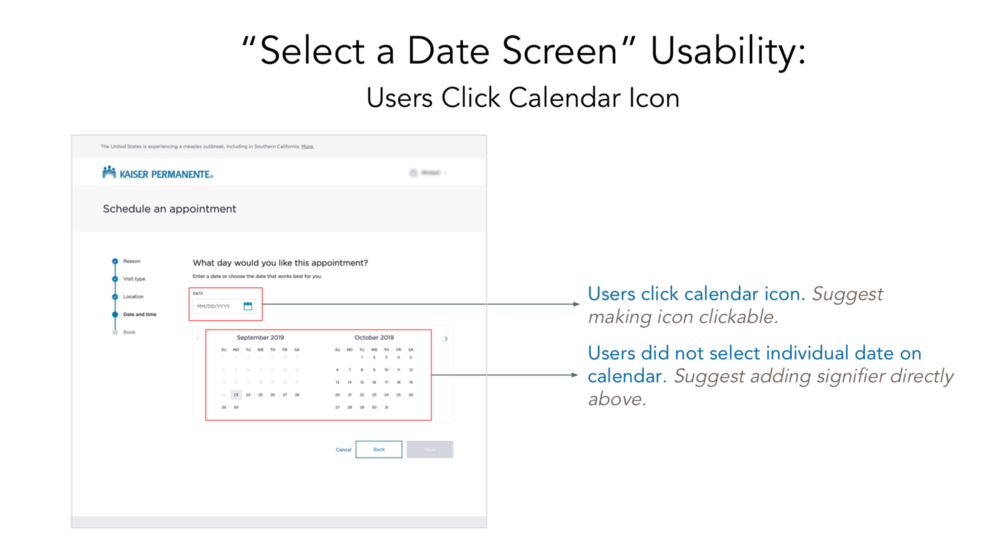
 Screenshots with descriptive call-outs are a great way to showcase changes and pivots made during the design process. Image credit Justin Morales.
The results and next steps
Now it’s time to show your final designs. Make sure to link this section from your introduction at the top of your case study in case your readers want to jump straight to it.
This section is where you’ll provide high-fidelity mockups of your product. There are a few ways to do this. You can also create a GIF to showcase certain user flows like this:
 GIFs are a great way to showcase the results of your design when creating a UX case study. Image credit Justin Morales.
Or, feel free to take a simple approach with mockups like this:
 Mockups are an effective way to showcase before and after results. Image credit Justin Morales.
After you blow the reader away with your impressive final design, you can address the next steps in your design process. Realistically, a product will continue to grow in an iterative process; explaining the direction the product is heading or talking about features that are coming up in future iterations is a great way to showcase this.
Here is an example of next steps for a minimum viable product (MVP) for a wine-pairing app.
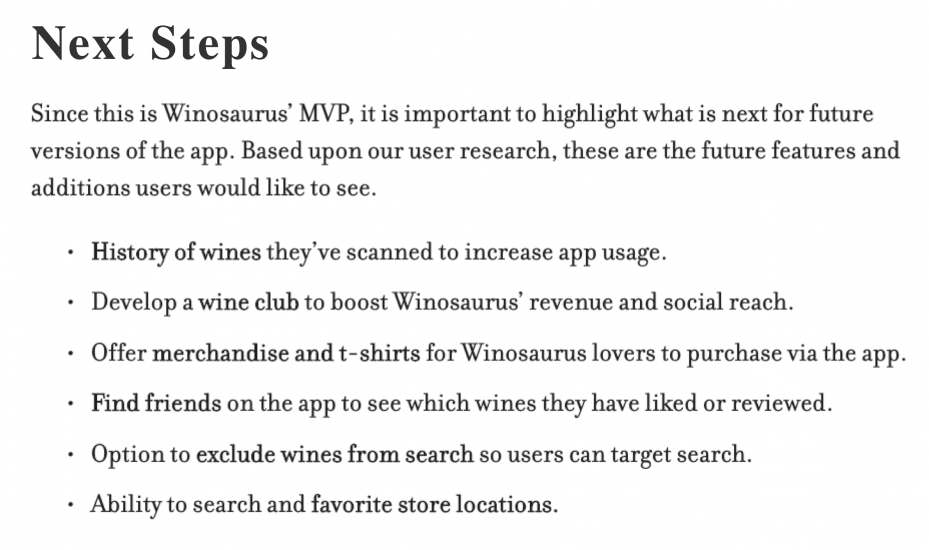
 Include a list of “next steps” in your UX case study alongside your final design. Image credit Justin Morales.
Conclusion
Follow this UX case study template and you’ll be well on your way to your dream job. Just remember: When you’re writing your UX case studies, show how your users influenced your design decisions. This is the heart of user-centered design and the best way to articulate how you will be a valuable asset to any hiring company.