Everywhere you look, designers are rolling up their sleeves, looking for ways to use their skills to impact their communities. Whether it’s for a cause close to your heart or something that has recently grabbed your interest with clarity and vigor, here’s a simple tutorial on how to design for your community.
Believe it or not, design has the power to change lives, influence, and create impact. How you choose to give back to your community is up to you. This guide is meant to walk you through how you can figure out your next community project.
So you have an idea…
Ideas are plenty, but execution is important. You know that you want to give back to your community, but how? Answering the following questions honestly can set your community project up for success. (Note: I’m making the assumption here that you want to create a digital tool or product, but please know that this is not limited to just the digital realm).
- Why do you want to create this?
- What impact do you hope this will have?
- Who is this for?
- When do you want to put this out into the world?
- Where will this live?
- How will this improve your community?
- Is this something you’re passionate about? (As in, can you see yourself maintaining this project or resource in years to come?)
Getting personal: When I created “The Guide to Allyship,“ it was because I had a personal experience where an ally didn’t deliver on their promise of allyship. I realized that it’s one thing to claim to be an ally, and another to step into that role. Perhaps, some people don’t have resources and guidance to be better allies. I chose to channel my frustration into a tool that helps people engage with communities they want to help in a positive way.
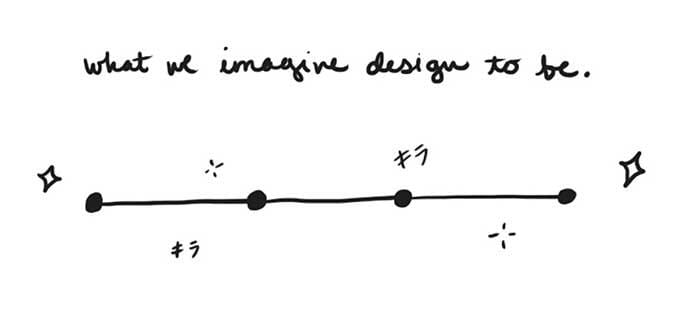
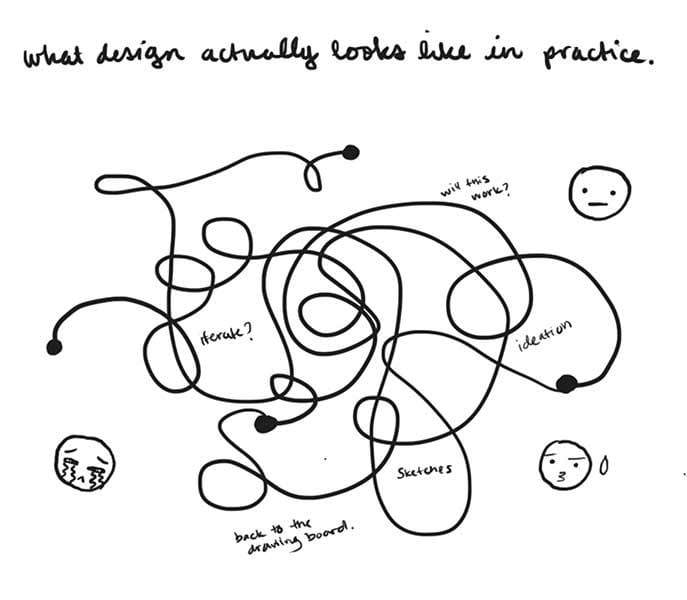
Design isn’t linear
As a new designer, there are two myths that I would like to dispel:
- There is a mystical, “right” way to design.
- Once you find the “right” way, you must never deviate from that path of “perfect” design process.

We can rephrase both of these to be:
- Each company/team has a way in which they design.
- It’s okay to deviate from a traditional path of design process if it brings you to a solution that ultimately helps the people interacting with the design.

You have a lot of tools in your toolkit, so it can be hard to figure out what to use and when. Should you do research first? Should you do some sketches? Maybe you should try building it, first? You need to be willing to explore to find out what you want to do first.
Loosely, we can define the design process as:
- Set goals
- Research
- Define requirements
- Determine framework
- Refine
- Support
Guidelines can be great when you have a system in place, where research has been done extensively and there’s institutional knowledge to pull from that informs your problem-solving. But what happens when you don’t have that?
Inherently, design is not linear, even though we often talk about it as such. Design is a process and sometimes processes are messy and don’t follow rules to a “t”, in order to get the best results.
I’d like to propose something radical: You don’t have to use every single tool in your designer toolkit. You can use what’s needed for the project. Sometimes, you really do need to put it out in the world so you can gather information and make changes as you go.
Getting personal: When I co-created Good for PoC with friends Catt Small and Jacky Alciné, we followed a path of “messy” design process. First, we created a survey to gather information about people and their positive experiences at companies. Once we had a enough submissions, we built a site. We make a quick and rough high-fidelity design, built it, and published it. We needed to get it out into the world. When it was time to embark on a redesign, we decided to use a more detailed design process: wireframes, branding strategy. We used tools in our toolkit as we needed them, rather than trying to force the situation to bend to the will of the tool.
The process of creation
You’ve got your idea, you’ve done some pre-work, now it’s time to get into what you’ve been waiting for–creation.
I’m going to walk you through my process for re-designing my “Guide to Allyship“ project. Even when iterating on an existing project, it’s reasonable, and even encouraged, to take another look at the questions you initially asked yourself when creating a community project in the first place.
With the “Guide to Allyship” project, I knew there was another direction I wanted to take it. That direction would make it seem like an entirely new project. This meant that I was, in essence, starting from scratch.
Here are my answers to the questions shared earlier:
- Why do you want to create this?
- I want to create this as a tool to replace my “Guide to Allyship”. I’ve realized that the ways in which we use the word “ally” can often apply to mean someone who wants to provide support in theory, but not in practice. The word leaves room for ambiguity and unshared responsibility.
- What impact do you hope this will have?
- I want people to focus on two simple behaviors:
- Being better than they were
- Becoming active collaborators in their own education and the world around them
- Who is this for?
- Anyone who wants to become a better collaborators to communities that are traditionally marginalized.
- When do you want to put this out into the world?
- I’d like to launch this in January 2019.
- Where will this live?
- I’ll be hosting it on GitHub.
- How will this improve your community?
- This will improve my community by creating a resource that anyone can contribute to about becoming a better person because we can all work to become better, regardless of our intersections or lack thereof.
- Is this something you’re passionate about? (As in, can you see yourself maintaining this project or resource in years to come?)
- Definitely, but I’ll likely seek people who want to contribute/open source it so I don’t have to maintain it all on my won.
Now that I’ve answered these questions, I feel like I have a clear path in terms of how I’m going to design. I’m going to hop into Adobe XD to give you an idea of how I like to design.
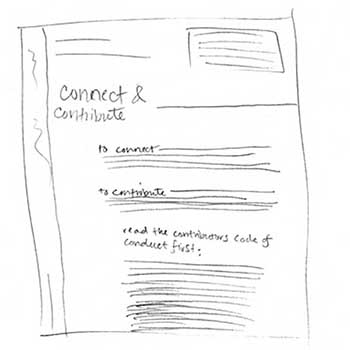
Step 1
I’m choosing to sketch first, because that’s the best way I tend to work first. Choose the first step that works best for you. Maybe you’re a someone who can code write in the browser. Or maybe you’re most comfortable starting right in your design program of choice. Do what feels right to you!
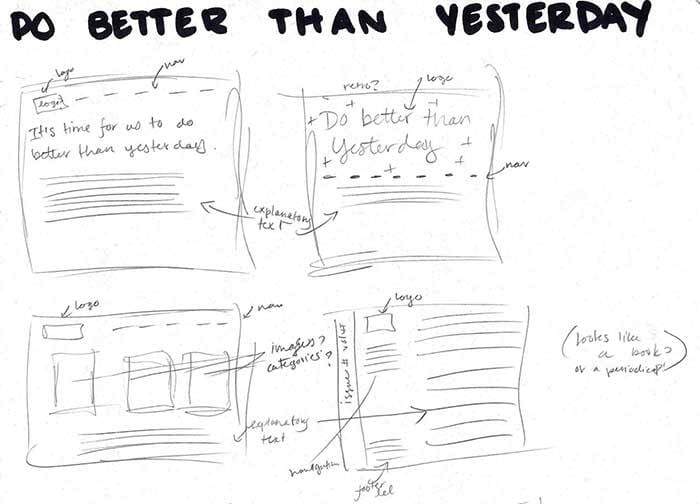

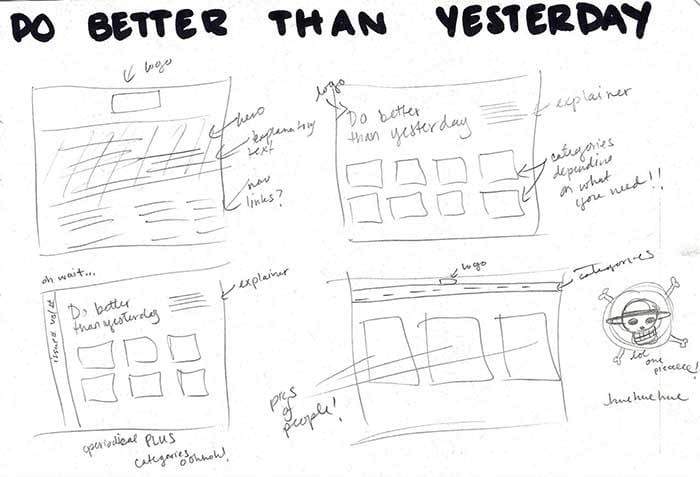

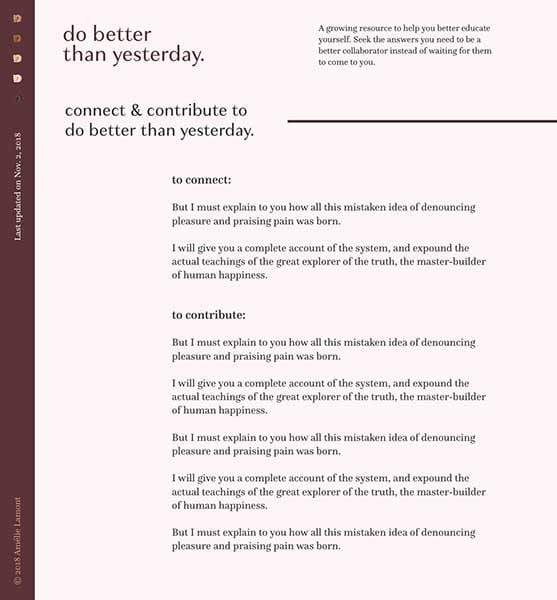
Step 2
I’ve chosen to work with Adobe XD for this project. I’m going to bring all of the sketches that I’ve created on paper into Adobe XD, only in higher fidelity.
I’m choosing to bring all of my sketches because, well, I don’t want to think that I’ve somehow found the “perfect” design. I want to compare them all and figure out how they each support my goals.
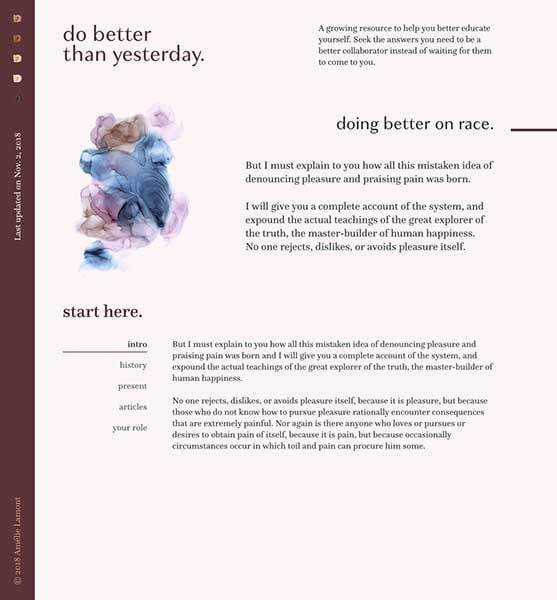
Step 3
We can now step into a higher fidelity. Depending on who you are, this can be fun or not.
Step 4
After this point, you can continue to tweak to get your desired result. I’ve picked one design to go with and I’ve realized that I needed to add some more pages so I can better understand what the site will look like.

I also realized that I need to write some simple copy for the site and figure out how this site will function. I think I want it to be an open source resource that people can contribute articles and advice to each section. Let’s go ahead and create the other pages so that we can see what that will look like.
I’m going to sketch those pages and then bring them into XD to play around with. I’ve jumped back into sketching and sure, I “should have” realized that I wanted other pages before opening up XD, but remember, design isn’t linear. I didn’t make a “mistake”. This is a process and a personal project. I, and you are, too, am allowed to figure out the best path that will help me bring this project to life.

Step 5
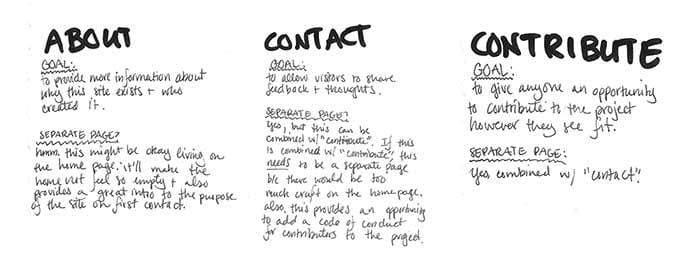
When creating an app or website that has multiple functions/pages, it’s important to define what the purpose of each function/page will be.
In my case, I’m adding 3 pages: about, contact, and contribute. I’m also going to be designing one of the pages that speaks about a certain type of oppression.
The questions that immediately come to mind are:
- Do all of these need to be separate pages? If so, why? If not, why?
- What is the purpose for these pages? How will they serve the user?
- Is the page adding to the site or is it necessary cruft?
This isn’t an exhaustive list, but it’s something to think about. I’m going to go ahead and answer those questions for my pages.

Step 6
Actionable feedback can make a world of a difference. When you’re stuck on a design, you can’t see the forest from the trees. When I’m in this place, I’ll share screenshots with trusted friends who can provide actionable feedback.

Step 7
When you’re satisfied with the final result, congratulations! You did that! (I still have copy to work through, but for the purposes of this tutorial, you get the gist of what I’ve created.)
As for next steps, I’m likely going to end up coding this myself, but you don’t have to do that. Don’t ever allow a limitation in skill or industry dogma (“all designers should code”) prevent you from putting your community work out into the world. You have something special to share. So whether that means hosting your site on Adobe, coding it yourself, or using other tools to get it out into the world, please go right ahead.
It’s out in the world, what’s next?
Now that your project is out in the world, what happens next? That depends. If the project is one that requires maintenance, you’ll have to figure out steps to continue to maintain it, including finding the time. If the project can live on its own, then you’re pretty much done.
Most important, you’ll want to measure the project’s impact in the community. After all, it is a community project. Listen to feedback, make adjustments and make sure your project is serving your community and providing value in the way you intended.