The best design follows an iterative process where designers can share, test and validate ideas quickly and collaboratively. Usually the process goes something like this:
- You undertake research, working with users to identify the underlying user requirements that need to be addressed.
- With this research in hand, you define the problem you’re trying to solve and establish a hypothesis.
- With the problem defined you build a prototype.
- Using this prototype, you test your assumptions, measuring against your hypothesis.
- Finally, you return to stage one, refining your thinking and iterate through the process again, working your way closer to a finished solution.
At each loop throughout the
process, the fidelity increases in your prototypes. The earlier in the process
you can identify and fix problems, the easier and the less expensive it is. The
further into a process you get, as the fidelity of what you’re building
increases, the more expensive it becomes to make changes. This is where
prototyping comes in.
We are fortunate as designers to have a wealth of free prototyping tools at our disposal at a wide range of fidelities. At one end of the spectrum, we have lo-fi paper prototypes, while at the other end we have interactive, hi-fi digital prototypes.
Digital prototypes allow us
to build realistic, clickable proof of concepts that allow users and
stakeholders to get a feel for what we’re building. These prototypes enable us
to test our assumptions and move progressively towards finished solutions.
Clickable prototypes also
allow us to test our designs with users and other stakeholders, bringing them
into the design process in a meaningful way, and allowing us to test
information architecture, layout and visual hierarchy, and interactive
elements.
There are numerous other
benefits of prototyping, including:
Let’s dive a little deeper
into these and make a case for prototyping — a bridge between your original
idea and your final build — as a core part of the design process.
Prototypes save you time and money
The golden rule of
prototyping — and developing any new idea — is to fail early and fail
inexpensively. Prototyping enables misunderstandings to be identified and
addressed as early in the design process as possible. The earlier in the
process issues are addressed, the better — saving you time and money.
The deeper into a project
you are, the more expensive it is to fix mistakes. Prototypes — whether lo-fi
paper prototypes or digital hi-fi prototypes — are a cost-effective way of
identifying changes that might need to be made before you embark upon a
finished build, at which point changes become increasingly more expensive to
implement.
Prototypes help get everyone involved in the design process
Even a modest project will
typically encompass a number of different stakeholders. It’s important to
engage with everyone involved in a project, bringing them on the journey from
idea to finished product.
Prototypes are helpful for including the wide range of participants in a project: designers, developers, project managers, business analysts, and everyday users. (This list — depending on the size and scope of the project — is potentially just the tip of the iceberg.)
Prototypes are a great way
of getting everyone involved in the design process. They also keep the
conversation going, so that designers don’t disappear for weeks on end building
complicated solutions to problems that perhaps don’t exist.
Prototypes act as a bridge between designers and developers
As our industry has become
more and more complex, the idea of “unicorn designers” — who have deep skills
as both designers and developers — is one that’s thankfully being left behind.
It is simply too complex now to be a master of all trades. We are increasingly
working in multi-disciplinary teams, drawing on the strengths of different
specialists, and, in this context, prototypes act as the glue that holds
everyone together.
When the design of a
product or feature is finished, and it is being passed on to a more skilled
developer to undertake the final build, a high fidelity, clickable prototype
ensures that the developer has a clear understanding of what’s what.
This is particularly true
when it comes to designing interactions. Rich, interactive prototypes are
considerably more powerful — not to mention immersive — than a series of flat
visuals that lack interaction. They provide a very clear picture of not only
how something looks, but also how it works.
With this in mind, let’s explore the process of building prototypes.
Paper Prototypes, Wireframes, and Clickable Prototypes
With the benefits of prototyping
defined, it’s time to dive deeper into the prototyping process. We can, of
course, create product prototypes at a wide range of fidelities and using a
wide range of tools.
These include:
- Rapid, sketched paper prototypes
- Lo-fi, monochromatic wireframes
- High-fidelity, clickable mockups
As we move through the
spectrum of prototypes, we can provide a more comprehensive view of our design,
including color palettes, typographic choices, and other aspects including
interactions and animations. In short, prototyping takes place across a
spectrum of fidelity, from low detail to high detail.
As we work our way up the
levels of fidelity, we’ll eventually build prototypes in the medium they’ll be
delivered in. For example, the final prototypes for a website will ideally be
built using HTML, CSS, and JavaScript so that we can tailor them to the medium.
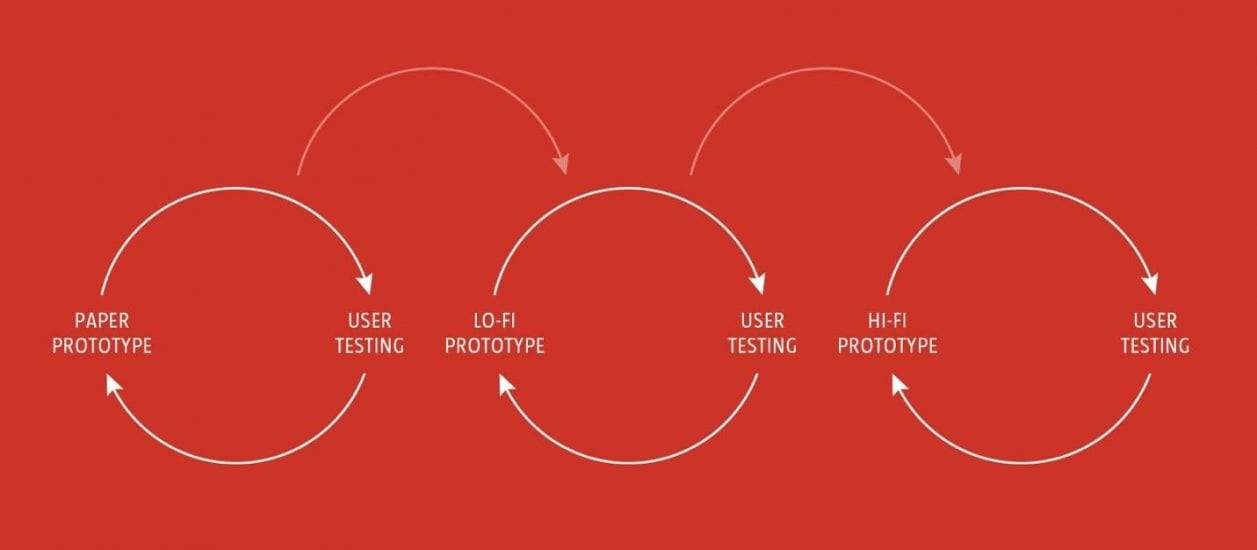
The prototyping process is
a journey, transitioning through levels of fidelity. There are many different
types of prototypes — low, medium, and high fidelity — and these are suited to
different points on the design journey.
 Lo-fi vs H-fi wireframe model
Prototypes
are involved at every stage of the design process, from the earliest iterations
where you are often thinking aloud; via clickable prototypes where you start to
test assumptions; to detailed prototypes where you begin to implement your
design.
At the start of the journey,
it’s important to focus on low-fidelity approaches that are low cost and fast
to implement. Paper is the perfect prototyping tool at this stage in the process.
Once you’ve undertaken some initial testing with your paper prototypes, it’s time to move on to something at a higher level of fidelity — creating clickable lo-fi prototypes with wireframes. These help your users and stakeholders get a much better picture of how everything works together.
Finally, it’s time to move
on to high-fidelity prototypes. At this point in the process, we’re increasing
fidelity, moving from wireframes to mockups, and adding in those elements that
simulate a final build, including interactions and transitions. Creating
interactive hi-fi prototypes provides users and stakeholders with a very clear
picture of the end result.
Of course, every project is
different, and at times, you might need to approach your prototyping in a
different order. When building a complex web-based SaaS application, for
example, you might need to start prototyping in HTML earlier in the process in
order to implement and test web technologies. As always, the approach you
choose will depend on the project in hand.
The power of paper
Paper is an incredibly powerful tool for prototyping. As a very low-cost prototyping medium, it frees you up, reducing the “weight of expectation.” The beauty of paper is that it’s also collaborative, allowing you to design as a team, collectively. As Khoi Vinh’s Design Tools Survey shows, paper is embraced by designers the world over with 64 percent of designers using paper as an integral part of their process.
Like anything, paper prototyping is a skill that gets better with practice and some time spent sketching interfaces will pay off. I recently attended a full-day workshop on sketching interfaces with Eva-Lotta Lamm, and I left with lots of ideas to enhance my paper prototyping approach.
One simple technique that
improved my sketches dramatically was being tasked to draw an interface
(Twitter, YouTube, Kickstarter, and so on) in as short a time as possible, just
a minute or two. Running through this process repeatedly forced you to focus
and speed up your sketching considerably.
The more you draw, the more
you improve your thinking and communication skills. You don’t need to be in a
workshop to do this, however. Simply set aside some time and practice, and your
paper prototyping skills will improve immeasurably. Just as an athlete warms up
before a race, so too, we can warm up our mental muscles — before embarking on
a paper prototyping session — in a similar manner.
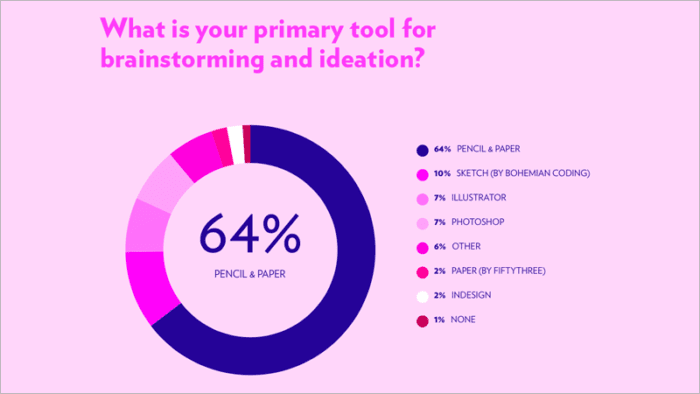
 Design Tools survey. Image by Khoi Vinh.
Khoi
Vinh’s Design Tools Survey underlines the importance of paper as a
design tool, with 64 percent of respondents reporting that they use paper as
their primary tool for brainstorming and ideation. Paper’s usefulness also
extends to sketching interfaces, acting as a bridge between the ideas phase and
the layout phase.
In workshops I run —
whether it’s for students or professionals — I’ll always kick-off with paper.
Paper is considerably faster than working on a computer. And by working at an
inherently lower level of fidelity, it forces you to think through the process,
defining flows and mapping out interfaces. It’s the perfect tool for generating
and realizing ideas.
Lo-fi — low-stress wireframes
With the broad brushstrokes
established at a low fidelity using paper prototypes, it’s time to start
transitioning towards a slightly higher level of fidelity using wireframes. At
this stage in the prototyping process, we’re moving from paper to screen and
incrementally increasing the fidelity.
A wireframe is
essentially a skeleton for your design. As a lower-fidelity design deliverable
— which is focused on structure, as opposed to look and feel — wireframes help
you to focus on functionality and not get lost in detail. Wireframes distill
the interface down to simple monochromatic shapes and are helpful for
communicating high-level structure.
Wireframes offer a number
of benefits:
- With the “visual grammar,” or look and feel,
stripped out, they are faster to create, enabling you to focus on
functionality.
- As lo-fi deliverables, they can be rapidly
updated during user testing.
- With their stripped-down design, they put
less pressure on users and stakeholders, allowing them to speak freely about
design decisions without fear that they are criticizing a finished design.
- They are less precious, allowing designers to
take on-board feedback without feeling too attached to them.
- Their unfinished look takes the pressure off.
No one expects a wireframe will be in a fit state to ship the next day.
With their focus on
information architecture, wireframes enable you to quickly map the journey
through content. Wireframes are also useful for helping to establish the scope
of a project, enabling you to identify all the different screens you might need
to design.
Use a free website wireframe tool to create lo-fi clickable prototypes, which can be incredibly useful by providing users and other stakeholders with a functioning prototype that enables them to click through a series of screens. Lo-fi prototypes are extremely useful for driving design conversations, enabling you to edge your design forward through discussion. For more inspiration, check out these wireframe examples we’ve curated.
Hi-fi clickable prototypes
Once you’ve used your lo-fi
clickable prototypes to iron out any issues, it’s time to build a higher
fidelity prototype to provide a more realistic experience. High-fidelity
prototypes are useful for bringing a design to life, helping everyone to get a
feel for both the visual design and the interaction design. By including real
content in your prototype, your users can experience how a website or an
application functions and flows and provide helpful feedback.
Prototypes at this level of
fidelity — rather than in the finished medium — are also considerably quicker
to build, helping you to:
- Validate your assumptions, testing your
ideas,
- Communicate your thinking, enabling others to
provide feedback, and,
- Pitch ideas — when you’re proposing a new
feature, for example.
When it comes to selecting
tools for hi-fi prototyping, it’s recommended to select the tool that allows
you to:
- Gather feedback from everyone involved in the
project directly within your prototype. You should be able to publish
prototypes on the web and provide a link for stakeholders to view or comment on
your prototypes.
- Share specifications with developers. Your
hi-fi prototype should be a single source of truth for your whole team. The
tool should enable developers to inspect your designs for colors, typographic
styles, and various measurements.
In closing
As we work our way through
the design process, it’s important to embrace the right tool for the job at
hand. Different tools have different strengths and lend themselves to different
tasks.
When you’re mapping out
ideas at an early phase in the design process, paper is the perfect tool. It is
both cheap and efficient. Because of this, it takes the pressure off you. Paper
is also perfect for collaboration, allowing multiple designers to prototype
collectively.
Wireframes are perfect when
you’re focused on testing functionality and getting your high-level structure
in place. Stitching wireframes together to create lo-fi prototypes enables you
to map out user flows without getting lost in the details.
Finally, high-fidelity
prototypes created using more detailed mockups allow your stakeholders to get a
feel for how a design looks and feels. At this point in the prototyping
process, the details matter: color palettes, typographic choices, and other
aspects, including interactions and animations.
Regardless of the end
outcome — be it desktop or mobile, web, or native — a considered prototyping
process, one that is iterative in nature, will deliver the required outcomes,
ensuring that what’s designed meets our users’ needs. Pick the right tool for
the job, and you’ll be all set to go.